Comply Canal Tip Clarification

Comply™ offers a variety of products related to hearing aid maintenance and repair, including a line of temporary earmolds designed for hearing instrument demonstrations and/or as a provisional solution in those situations where a current hearing instrument wearer requires an earmold remake.  There are three temporary earmold products under the Comply brand this post will address including: 1) Comply Canal Tips, 2) Comply Snap Tips, and 3) Comply Platinum Soft Eartips.
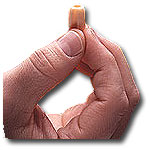
The Comply Canal Tips represent the original temporary earmold issued under the Comply brand name. These are bullet-shaped, threaded foam tips that screw on to the end of a sound tube adapter; the other end of the sound tube adapter is attached to the earhook of a BTE.

Comply Snap Tips serve the same purpose as the Comply Canal Tips with the exception that the Comply Snap Tips are disk-shaped rather than bullet-shaped. The Comply Snap Tips fit onto a special sound tube adapter that enable the clinician to snap the tips into the earpiece rather than screwing them on. To attach the Comply Snap Tip to the sound tube adapter, put the earpiece in the hole located in the center of the tip, firmly push the earpiece of the sound tube adapter straight down, and the earpiece will engage, snapping the tip in place.  Finally, the Comply Platinum Soft Eartips are the same exact thing as the Comply Snap Tips. The only difference is that the Comply Platinum Soft Eartips are comprised of softer material, resulting in increased comfort and the foam material does not require rolling or squeezing of the tip, offering easier insertion. For additional information on temporary earmolds, check out the Ask the Expert Question from AudiologyOnline addressing this topic.

Posted in Tools & Accessories | Tagged , , , , , | 2 Comments

Alarming Facts about Hearing Smoke Detectors!!

Did you know that the standard signal emitted by most commercially available residential smoke detectors falls between 3,000-4,000 Hz? Furthermore, the majority of residential fires occur between 11pm and 7am when most people are sleeping. According to Bruck & Thomas (2007), sleeping adults with a mild to moderate hearing loss respond to traditional smoke detectors about 50% of the time. Since hearing instruments are not typically worn during sleep, this creates a safety concern for our patients with hearing loss.

While there are a number of smoke detectors specifically marketed to the hearing-impaired population, one innovative product is the Lifetone HL Fire Alarm & Clock. This product was designed to work with existing smoke detectors already installed in the home. It is essentially a bedside fire alarm that also functions as an alarm clock. The product is equipped with a patented sensor that continually monitors sound. When a smoke detector is activated, the Lifetone HL will detect the smoke detector’s signal and, in turn, generate a loud, 520Hz square wave signal at bedside that has shown to be effective in waking 95% of individuals with hearing loss. This product also comes packaged with a bed shaker.

For more detailed information about hearing loss and smoke detectors, check out my article “Alarming Facts Audiologists Must Know” published in Audiology Today (Vol 22, issue 1) or the text-based course called “Alarming Facts About Smoke Detectors” published via AudiologyOnline.  If you would rather hear all about it, AudiologyOnline has a free-to-view webinar called Alarming Facts About Smoke Detectors.

NOTE: since the publication of this post, the Lifetone HL Fire Alarm & Clock has been on a significant manufacturer backorder situation; it remains unclear as to whether or not this product will be commercially available. For another solution, please see the October 16, 2013 post on the Serene Central Alert CA-360.

Posted in Hearing Assistance Technology | Tagged , , , , , , , , | 1 Comment

Dino-Lite vs Hi-Res Dino-Lite: what’s the difference?

There seems to be a little bit of confusion as to what the real difference is between the original Dino-Lite Digital Video Otoscope and the Hi-Resolution version of the same product.  Other than price and image resolution capabilities, what makes these two sister products different?

The most affordable video otoscope currently available is the original Dino-Lite (shown above). This easy to use video otoscope plugs directly into the USB port of a computer (although there is a version that will connect to a TV) and comes packaged with its own video capture software that is compatible with most computer systems.  Simply load the software and plug the USB cable from the Dino-Lite to the computer USB port.  Images may be saved as JPG or BMP files. It also allows video files up to 2 minutes in length (saved as AVI).

The Hi-Resolution version of the Dino-Lite is essentially the same otoscope as the original Dino-Lite described above with a few key differences. From an operational perspective, both otoscopes mainly work in the same manner; the one exception is that the Hi-Resolution version is equipped with a “micro-touch” setting that enables the user to capture an image by touching a designated area of the otoscope with their finger tip rather than needing to press a key on the keyboard or the mouse.

Original Dino-Lite View

Hi-Res Dino-Lite view

In terms of field of view, as shown in these images of my own tympanic membrane, the original Dino-Lite projects much more speculum, creating a more pronounced black frame around the image of interest whereas the Hi-Resolution version projects a larger field of view on the screen.   Furthermore, the original Dino-Lite is equipped with four LED lights; the Hi-Resolution version has six, providing more robust illumination.  Regarding resolution, whereas the original otoscope offers 640 x 480 pixels, the Hi-Resolution version offers 1280 x 1024. Both otoscopes represent good otoscopes available at a price point lower than other commercially available video otsocopes although the Hi-resolution version is about twice the price than the original Dino-Lite.

Posted in Otoscopes, Headlamps & Earlights | Tagged , , | 3 Comments

AlertMaster Gets a Facelift!

The Clarity AlertMaster® is an alerting system designed to provide visual notification of certain sounds or activities occurring in the home. While the system has been around for years, it recently received a much needed facelift and deserves another look in terms of what solutions this product can potentially provide to your patients.

The AlertMaster is available in one of two general systems: 1) AL10™ (shown above) and 2) AL11™ (shown below).  Both systems are comprised of a base unit and doorbell transmitter. When the doorbell transmitter is pressed, the base unit will cause a connected lamp to flash in a unique on-off pattern, visually alerting the user that someone is at the door. When the telephone rings, the same lamp will flash but in a different on-off pattern.  The front panel will also illuminate either the phone or door indicator, further assisting in the differentiation of the sound source. As a build-upon system, some optional transmitter and receiver accessories are available for each system.

There are several features that differentiate the AL10 from the AL11; the AL10 comes packaged with a bed shaker and is equipped with a built-in alarm clock.  The AL10 also features a built-in lamp timer, allowing the user to have the connected lamp turn on and off during designated times throughout the day to create the illusion that someone is at home. Finally, the AL10 has a microphone at the top of the base unit, enabling the system to visually alert the user of other loud sounds that may occur in the home.

Posted in Hearing Assistance Technology | Tagged , , , , , , | Comments Off on AlertMaster Gets a Facelift!

Making the Correct Impression Decisions

Earmold impression material is packaged in a variety of forms including equal component systems, tub and accelerator, powder and liquid, individual units, and cartridge material. For those of you thinking about switching to cartridge material or considering a change in cartridge brand, keep the following in mind to ensure you make the correct impression decisions when you are ready to order supplies.

Know the Model of Impression Gun:  Two types of impression guns are currently available and include the DM-50 model and the DS-50 or S-50 model. Unfortunately, both gun models look pretty much the same despite the fact that each is designed to cartridge comparisonaccept different cartridges.  As shown at the right, the DM-50 gun is designed for is designed for cartridges with a square base whereas the DS-50 or S-50 gun is designed for cartridges with a rounded base.  Since many manufacturers have cartridge material available for either type of gun, it is important to communicate the type of gun you use when ordering impression material to ensure the correct cartridge is being ordered. To quickly identify gun model, look for the model identification that typically is embossed on one side of the gun on the base (immediately above where the handle and trigger meet). If that information is not available, look at the base of the cartridge material to determine gun model (i.e. DM-50 is square and DS-50 is rounded cartridge base shown above).

Make Sure Mixing Tips Will Fit Cartridge: While cartridge impression material typically includes mixing tips, there may be occasions where it will be necessary to order mixing tips only. There are a variety of mixing tips currently available that not only differ in length, but differ according to the type of cartridge it has been designed to fit. Once again, cartridges designed to fit DM-50 guns require tips with a different attachment configuration than cartridges designed for the DS-50 gun.


Posted in Impression Material | Tagged , , , | 2 Comments

The Misunderstood Macroview Video Otoscope

Did you know that the Welch Allyn Digital Macroview Video Otoscope not only captures images but can also record video? If you weren’t aware of this otoscope’s capabilities, don’t feel so bad; since the otoscope interfaces with the plug and play feature of computers, with older versions of Windows, you can easily fall under the impression that it can only capture images, making it one of the most misunderstood otoscopes used by audiologists. The good news is you can record video with the Macroview in the presence of older versions of Windows!

For those of you using a computer with Windows 1997-2003 versions, the Digital Macroview Video Otoscope may be used to perform otoscopy and capture images by simply plugging the otoscope into the USB port of a computer via the 10 foot USB cable without the installation of the WA Viewer Utility CD (included in packaging). Your computer will recognize the presence of a new USB device. By navigating to MY COMPUTER and selecting the USB VIDEO DEVICE icon, the otoscope’s video will be activated, streaming images on your computer screen. To capture an image, press and hold any one of the two function buttons located on the back of the otoscope head for 1 second and then release. Bare in mind, however, that using the Digital Macroview Video Otoscope in this fashion will NOT allow you to record video. This is where some users assume that this video otoscope can only capture images.

To record video using older versions of Windows, it will be necessary to install the provided software (WA Viewer Utility CD). Once the software is installed, select the WELCH ALLYN VIEWER icon from the desktop. The WA Viewer screen will allow you to not only perform video otoscopy and capture images, but to record video. In this scenario, images may be captured in one of two ways: 1) click the camera icon located on the left hand side of the computer screen with your mouse, or 2) press and hold any one of the two function buttons located on the back of the otoscope head for 1 second and then release. To start recording video, click the video icon located immediately under the previously mentioned camera icon with your mouse; click the same icon again to stop recording.

According to Welch Allyn, the Digital Macroview is a plug and play otoscope that will allow image capture and video recording for computers equipped with Windows XP Service Pack 2.0 or higher versions. To view a demonstration of the Digital Macroview Video Otoscope, go to the demo section of the WA website for a quick video demo.  Check out the Digital Macroview Quick Start Guide for reference.

Posted in Otoscopes, Headlamps & Earlights | Tagged , , , | 13 Comments

Bright Idea for Cerumen Management

A popular cerumen removal instrument used by many of my customers at Oaktree Products is the Bionix lighted ear curette. This disposable curette interfaces with a LED light source which provides illumination along the length of the entire curette.  To assemble the lighted ear curette, insert the end of the curette into the opening of the light source by aligning the pegs on the curette with the grooves inside the light source. Push the curette down into the light source and twist clockwise until the rotation stops. This will lock the curette into place and activate the light source. A magnification lens attaches to the neck of the light source to assist in enlarging the visual field. The lighted ear curettes come packaged in a quantity of 50 with one light source and one magnifier, and available in a variety of styles including (from left to right below) the AngleLoop®, Microloop®, Wavecurette™, FlexLoop®, and Infant Scoop®.  


Variety packs are also available.  Recently, lighted forceps were introduced (shown below), providing audiologists with disposable forceps for removing cerumen that is drier in consistency. Squeezing the spring grip will close the tip of the forceps. The lighted forceps come packaged ten to a box with one light source and one magnifier.

 As with the curettes, the lighted forceps have been designed for single use only. If you are interested in reviewing mechanical removal techniques, check out the free to view webinar on cerumen management at AudiologyOnline. If you prefer an article for reference, register for the free-to-view text base course at AudiologyOnline to access the publication Cerumen Management: Mechanical Removal.  Check out the cerumen removal blog spot by Dr. Jim Huttner who posts tips, techniques, and patient experiences related to cerumen removal.  Be sure to watch the one minute Bionix Lighted Curette Youtube video created by Oaktre Products.

Posted in Cerumen Management | Tagged , , , | 1 Comment

Hands-Free Business Phone Solution for Hearing Instrument Wearers

NOTE: since the post has been published, the Plantronics Bluetooth Deskphone Adapter has been discontinued. For a hands-free business phone solution for hearing instrument wearers, please see the more recent post from October 30, 2013 on the new QH2 Bluetooth Hub & Phone Amplifier.

Many professionals seem to be looking for a hands-free, wireless communication solution at the office that will allow them to use their multi-line office phone with their hearing instruments.  As long as the patient is a wearer of t-coil equipped hearing instruments, a Bluetooth solution is readily available by investing in two products.

Plantronics Desktop Adapter

The first product is the Plantronics Bluetooth Deskphone Adapter shown on the right. This component connects directly to the office phone.  The second product required for a hands-free business phone solution for hearing instrument wearers is a Bluetooth enabled neckloop such as the ClearSounds Quattro Bluetooth Neckloop (shown below). This component is worn by the hearing instrument wearer. Once the Plantronics Deskphone Adapter is properly connected to the business phone, it is paired to the ClearSounds Quattro Bluetooth Neckloop. Conversations from the office phone will be processed by the Plantronics BluetoothDeskphone Adapter

ClearSounds Quattro Bluetooth Neckloop

and then wirelessly transmitted to the ClearSounds Bluetooth Neckloop. Since the neckloop is equipped with a built-in microphone, the user’s voice may be wirelessly sent back to the Plantronics Bluetooth Deskphone Adapter, eliminating the need to rely on the receiver of the office phone to conduct a phone call. As long as the hearing instruments are in the “T” or “MT” position, the user will be able to converse over the phone both in a hands-free and wireless capacity.

Posted in Hearing Assistance Technology | Tagged , , , | 1 Comment